Modding Stoneshard with MSL
Introduction
ModShardLauncher (or MSL) is a tool that has the ambition of becoming the prefered method of modding Stoneshard. It is very much at an early stage of development right now, and as such quite a few key features are still missing. Additionally, some of the included features are still rough around the edges and not as friendly to beginners as we'd like them to be.
Important
At this stage, modding Stoneshard with MSL requires you to know how to mod the game with UndertaleModTool. This is because the focus of the project right now is on including more features, rather than making the existing ones more accessible. Eventually however, the project will reach a stage where no knowledge of GML or inner workings of the game is necessary for simple mods like adding weapons, swapping textures, etc...
Before we Start
Before creating a mod, you should have a basic understanding of C# and Visual Studio.
If you do not know how to use them, please learn them first, as MSL's API can be a bit complex at times. Here are some resources to get you started on that :
Tools
IDEs
In order to write your mod's code, you'll need a tool such as Visual Studio, Jetbrains Rider or even Visual Studio Code.
What do they do ?
These are professional development tools that can help you write code. This guide will use Visual Studio, as it is both free and easier to use for beginners than Rider.
While installing Visual Studio, make sure you choose the .NET Desktop Development workload.
You do not need to download any other workload.
.NET 6.0 SDK
Download the .NET 6.0 SDK, install it and when it's done, restart your computer.
ModShardLauncher Template (Optional)
You can download the official template for MSL Mods to avoid having to write boilerplate code. The easiest way to install it is to open a terminal and run the following command :
dotnet new --install ModShardLauncher.Templates
Getting Started
Let's start our modding journey by starting ModShardLauncher.exe.
This should create the Mods and ModSources folder if they didn't exist already.
Once this is done, you can simply close MSL for now.
Now, let's create a new mod using the MSL Template.
To do this, open up Visual Studio, click Create a new project, and in the search bar type msl.
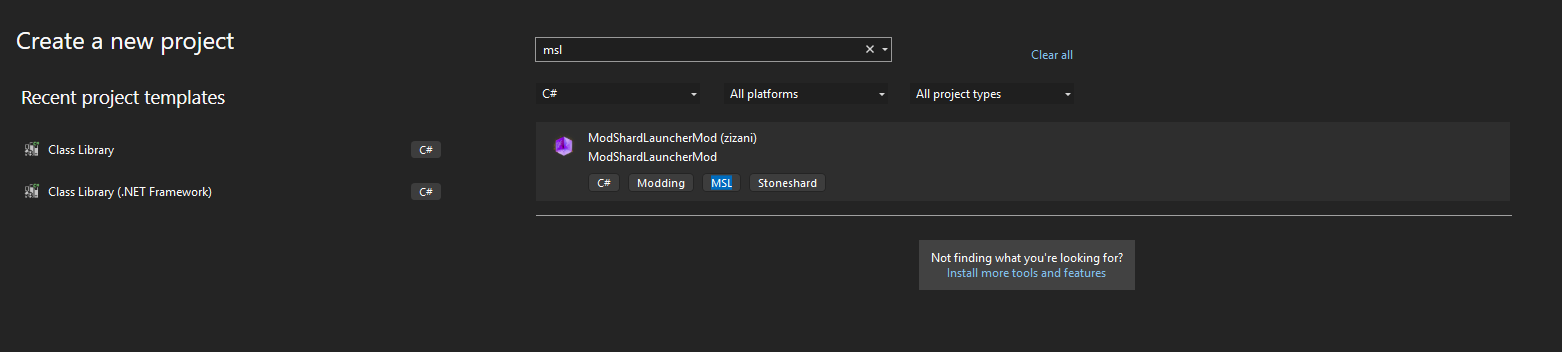
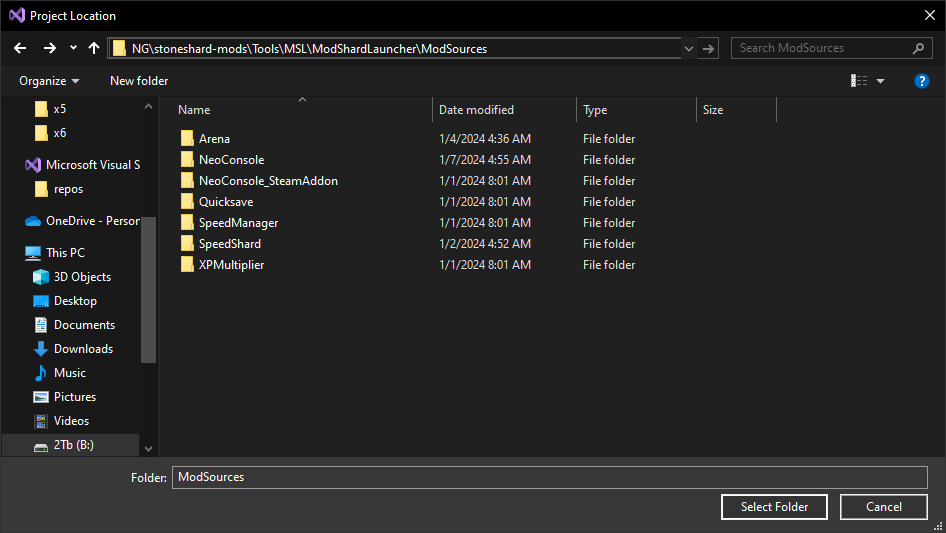
For MSL to recognize your mod you need to create the new project in MSL's ModSources folder.
Make sure to also tick the Place solution and project in the same directory box.
Hit the Create button and you'll be good to go !
Alternatively, you can also create a new project using the mod template with the CLI.
To do this, open a terminal, navigate to MSL's ModSources folder and type the following command :
dotnet new msl --name "MyMod"
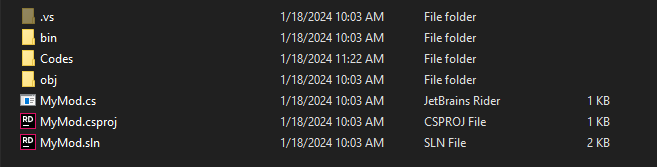
Regardless of your method, you should now see a new MyMod folder in your ModSources folder.
It should contain a solution, which you can open in your IDE of choice.
Boilerplate Code
Now that our project is set up, you should have a working solution with a class containing some boilerplate code. Let's quickly go over what it does, and why it needs to be there.
- The
usingdirectives allow us to use code from ModShardLauncher to write our mod. - This is the base class for your mod. All of your code should be contained within it.
- This variable contains the name of the author of this mod. Feel free to replace it with yours ! It's visible in MSL's Mod list.
- This variable contains your mod's name. Feel free to change it ! It's visible in MSL's Mod list.
- This variable contains your mod's description. Feel free to change it ! It's visible in MSL's Mod list.
- This variable contains your mod's version. Don't forget to change it when you update your mod ! It's visible in MSL's Mod list.
- The
PatchModmethod is your mod's entry point. Anything within it gets run by the compiler when your mod is patched into a.winfile.
Tip
Click on the + button next to the code to learn what it does.
Compiling our Mod
Right now our mod doesn't do, well, anything, but for the sake of learning let's compile it anyway.
- First, let's make sure we saved any change we made to
MyMod.csby pressing Ctrl+S. - Open MSL, click the folder icon at the top of the window and select your
vanilla.winfile. - Head to the
ModSourcesmenu (by clicking the C# button on the left). - Your mod should be listed here with a
Compilebutton next to it.
My mod isn't there !
If your mod isn't there, try restarting MSL.
If you created your project after opening MSL it won't show in the list until your restart it.
If your mod still doesn't appear after restarting, make sure you created your mod in the ModSources folder.
- Click the
Compilebutton. This generates a.smlfile in theModsfolder, which is your mod file. This is the file you can distribute to players. - There's no feedback when clicking on the
Compilebutton, so don't be alarmed, it's normal. - Next head to the
Modsmenu, and tick the box next to your mod. - Click the save button at the top of the window and save under the name
MyMod.win.
That's it you've now compiled your mod !
You can now start Stoneshard, select MyMod.win and test your mod.
Basic Injections
At this point we've got a basic mod, but it doesn't really do anything. Let's change that by injecting some code into the game's files.
In the MyMod.cs class, let's add the following code :
- This line inserts the code
scr_smoothSaveAuto()into thegml_Object_o_player_KeyPress_116at line0. We're injecting the gml code necessary to quicksave the game when the player presses the F5 key.
As you can see, using ModLoader.InsertGMLString allows us to inject a string of GML into an existing script.
But MSL's capabilities don't stop there, we can read code from a .gml file you wrote and inject it into a script.
For example, let's create a Codes folder in our project :
Inside the Codes folder, let's create a myCode.gml file with the following code :
| myCode.gml | |
|---|---|
Now back in MyMod.cs, let's change our code to the following :
- We replaced the hardcoded string with
ModFiles.GetCode("mycode.gml")which grabs the content ofmyCode.gmland injects it into the script.
Now if we compile this mod and press F5 in game, it should quicksave our game. That's great, but what if we want to edit a script that breaks when edited in UTMT ? The solution is the exact same as in UTMT, we can edit the assembly directly !
- This line inserts the assembly instructions corresponding to the quicksave code seen in previous examples.
Important Note
The demonstrated functions are far from being the only options to inject our code into the game files. This guide is meant for beginners, and as such tries to keep things relatively simple. For more options, feel free to check out the API.
Advanced Injections
For more advanced mods, you might require more accurate injections than simply inserting or replacing code or assembly instructions at specific lines. To that effect, MSL offers a collection of methods for precise injection, which also helps making your injections more resilient to updates by matching a specific line or set of line rather than using a line number.
They are divided in 4 different stages, namely :
- Loading
- Matching
- Acting
- Saving
Here's an example of that :
Msl.LoadGML("gml_GlobalScript_scr_sessionDataInit") // Loading a script from the game's files
.MatchFrom("global.HP = -1") // Finding the line containing `global.HP = -1`
.ReplaceBy("global.HP = 50") // Replacing it with `global.HP = 50`
.Save() // Saving the file
Important Note
Once again, this is only a simple example of the available functions, to learn more check out the API.